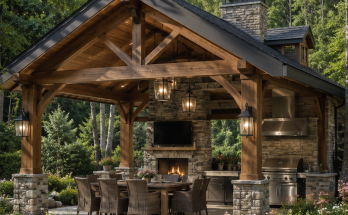
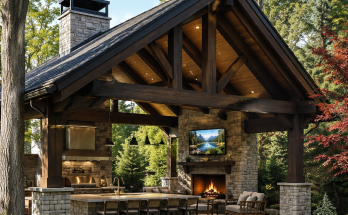
A grand outdoor pavilion succeeds when it is planned as a complete room in the landscape rather than as a grill placed beneath a roof. In this example, the kitchen, island, dining area, fireplace, and garden-facing lounge all work together beneath one substantial timber structure. The design feels generous because every element has a clear job, yet the materials and sightlines make those functions read as one cohesive space.
Begin with the experience, not the appliance list
Before selecting a grill, hood, or pendant light, define how the pavilion should work on an ordinary weeknight and during a larger gathering. Think through arrival, food preparation, serving, dining, conversation, cleanup, and the point at which guests move from the island to the fire. A successful plan lets those activities overlap without forcing people to squeeze past the cook or interrupt one another.
Make a simple diagram that identifies three kinds of space: work space, social space, and retreat space. The work space should keep heat, water, storage, and food preparation together. The social space should place guests near the cook without placing them in the active cooking path. The retreat space should be quieter and more comfortable, often oriented to a fireplace, garden view, or a protected corner of the pavilion. The best layouts make those zones obvious without relying on signs, partitions, or too much furniture.
Use the roof and frame to establish the room’s character
The steep timber roof is the architectural feature that gives this pavilion its sense of permanence. Its exposed trusses create a visual rhythm overhead, while the deep ceiling plane offers shelter from sun and rain. Because the main structural members are visible, their proportion matters. Slender posts under oversized beams can feel awkward, while heavy stone bases beneath undersized timber can make a pavilion look top-heavy. The frame should read as one system from foundation to roof.
A generous roof overhang is both practical and aesthetic. It protects the seating and cooking areas from light rain, reduces direct sun on counters, and creates a shaded transition between the interior of the pavilion and the garden beyond. The roof pitch should suit the architectural style of the house and local climate, but the overall principle is simple: it needs enough height and depth to make the structure feel like a room, not a low canopy.
Open-air structures still need careful engineering. Roof loads, wind exposure, frost depth, soil conditions, drainage, chimney weight, and the span of major beams all affect the final structure. Work with qualified local design and building professionals early, especially when the pavilion includes a masonry fireplace, a large roof, gas service, or substantial electrical equipment. That early coordination avoids expensive redesign after finishes have already been selected.
Anchor the design with a disciplined material palette
The appeal of this pavilion comes from the contrast between warm wood, textured stone, and high-performance metal. Wood softens the ceiling and makes the structure inviting. Stone brings mass to the fireplace, column bases, kitchen wall, and island face. Stainless steel gives the cooking zone a clean, purposeful character. None of these materials needs to dominate; the effect depends on repeating them in deliberate places.
Choose the timber finish after viewing samples outdoors in both direct daylight and warm evening light. A stain that looks rich in a showroom may look nearly black under a dense roof, while a very light finish can appear washed out next to pale stone. Stone should relate to the home, terrace, and garden rather than becoming a completely separate color story. Metal finishes should also repeat: if the grill hood is dark or stainless, echo that finish in lantern frames, shelf brackets, cabinet pulls, or furniture details.
Material transitions deserve as much attention as the materials themselves. A stone-clad post base needs a clear cap or clean joint where the wood begins. Countertops need edges that shed water rather than trapping it. Outdoor cabinets need durable, weather-appropriate construction and enough ventilation around appliances. By solving these practical intersections carefully, the pavilion will look better as it ages and will require less repair work later.
Plan the kitchen as a real work zone
A beautiful outdoor kitchen can still fail if the cook has no practical surface near the grill or no convenient place to store serving pieces. Give the grill usable counter space on both sides and keep a preparation area close to the sink, refrigerator, and storage. The island should remain open enough to serve food and seat guests at the same time. If an appliance door, cabinet drawer, or trash pullout will open into a major circulation route, revise the layout before construction begins.
Ventilation, fuel, electricity, and water should be considered before stone or wood cladding is installed. A hood, if required by the design and equipment, must be coordinated with the roof framing and clearances. Gas piping, shutoff access, electrical outlets, task lighting, drainage, and weather-rated fixtures should all be planned as a single utilities package. It is much easier to provide protected chases and service access during construction than to retrofit them after the pavilion is finished.
Make the island the social hinge of the plan
The long island shown here is not merely a countertop; it is the boundary between the active kitchen and the guest side of the pavilion. Its seating encourages conversation, while its stone surface visually ties the kitchen to the fireplace and support columns. For a comfortable result, avoid making the island so deep that people cannot talk across it or so narrow that it becomes crowded as soon as serving dishes appear.
Give the guest side a defined overhang and choose stools that can tuck in cleanly. Durable seating with backs is more comfortable for a long dinner, while lower stools may preserve a cleaner view into the garden. Storage below the island is particularly valuable for outdoor dishes, linens, serving boards, and weather-ready accessories. Concealed storage keeps the pavilion useful without making every item part of the visible décor.
Build a fireplace zone that invites people to stay
The fireplace transforms the pavilion from a daytime cooking area into an evening destination. Its surround provides a vertical focal point, and the hearth offers a natural reason to use the space in cooler weather. Position lounge furniture to support conversation first; the fire and screen, if included, should be easy to see without forcing every chair into a rigid row.
Keep combustible furnishings, rugs, and accessories appropriately separated from the fire feature, and confirm the design, flue, hearth, and fuel source with qualified professionals. A wood-burning fireplace, gas fireplace, or fire table each has different maintenance, ventilation, and operating considerations. Whatever the choice, the fire element should look integrated with the stonework and should not compete with the kitchen as the only visual focal point.
Layer lighting for work, comfort, and orientation
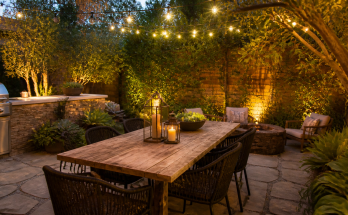
Outdoor pavilions often feel disappointing when every light comes from one bright ceiling fixture. This setting works because it uses layers. Recessed or downlighting supports grilling and cleanup. Lantern pendants make the island feel intimate and help guests understand where to gather. Wall lights, shelf lights, and low landscape lights carry the visual connection into the garden.
Put those layers on separate controls. Bright task lighting is useful when cooking, but a lower level is better for dining and conversation. Warm light generally complements timber and stone more comfortably than harsh cool light. Aim fixtures carefully so they illuminate counters, steps, and paths without shining directly into seated guests’ eyes or creating unnecessary glare toward neighboring properties.
Think about climate, drainage, and everyday maintenance
Comfort is determined by more than furniture. Consider prevailing wind, late-afternoon sun, humidity, insects, smoke direction, and the amount of rain that can reach the terrace. Fans, retractable shades, privacy planting, screening, and carefully placed walls can improve usability without closing the pavilion off. The terrace should drain away from the structure, and the planting near columns should not hold moisture against wood or masonry.
Build a maintenance routine into the design. Timber may need periodic inspection and refinishing. Stone joints, metal hardware, appliance covers, gutters, drains, and roof penetrations all benefit from regular attention. Use furniture covers or storage for cushions, and select fabrics that are intended for outdoor exposure. The most enduring outdoor rooms are not maintenance-free; they are designed so routine care is straightforward and does not spoil the visual experience.
Finish by framing the garden
The open sides of this pavilion are valuable because they turn the landscape into a living wall. Keep the strongest views open, then use planting to soften column bases, screen service areas, and create depth beyond the seating zones. Low planting works well near paths and steps, while taller shrubs or small trees can give privacy at the perimeter. Landscape lighting should guide movement and reveal texture without turning the garden into a stage set.
The final lesson is that a grand pavilion is built from relationships: roof to post, kitchen to island, fire to lounge, stone to garden, and daylight to evening light. When those relationships are resolved with care, the result is more than an outdoor kitchen. It is a durable, flexible room that makes the garden more usable in every season.