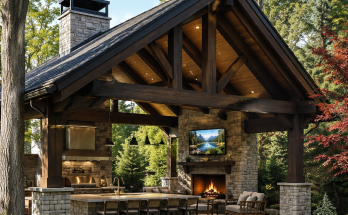
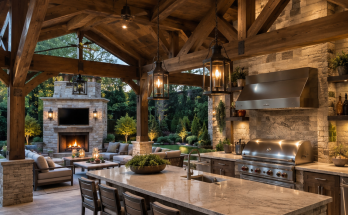
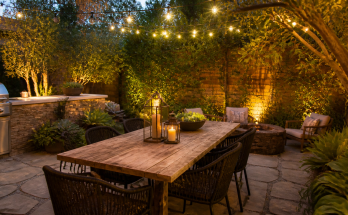
This timber-and-stone pergola shows how an outdoor room can feel intimate even when it remains open to the garden. The design brings a dining table, fireplace, compact kitchen, and sheltered roof into one composition, but its real success comes from the relationships between those elements. The heavy timber frame provides identity, stone gives the pavilion permanence, and the surrounding planting prevents the architecture from feeling isolated or overly formal.
Start with the pavilion’s role in the garden
Before choosing a roof form or grill, decide what the structure should contribute to the landscape. Should it be a quiet dining retreat, a cooking-focused gathering place, an all-season fire-side room, or a visual focal point at the end of a path? A clear answer will guide the size, location, circulation, and material choices. When a pavilion tries to be every kind of outdoor space at once, it can become crowded and difficult to use.
Here, the pavilion is treated as a destination that sits within a mature garden. The stepping-stone path leads guests toward a strong gable, while planting at the edges softens the transition from lawn to terrace. The structure feels open because the best views remain between the posts, yet it has enough mass in the roof, chimney, and stone bases to feel secure and sheltered.
Use the gable as an architectural threshold
The front gable gives the pavilion a recognizable face. Its high peak, dark roof edge, exposed truss, and deep timber beam make the approach feel intentional. Even without a door, the entrance has a clear sense of arrival. This is especially valuable in a large yard, where an open structure can otherwise disappear into the landscape or look like an afterthought.
For a welcoming elevation, pay attention to the layers of depth. A roof edge creates shadow. The truss provides a focal pattern under the peak. The posts establish the outer frame, while the stone bases ground the structure at lawn level. That layering becomes more noticeable at dusk, when lanterns and interior light begin to reveal the ceiling and structural details.
The roof must do more than look impressive. Its pitch, overhang, drainage, attachment points, and connection to the chimney or hood all need to be resolved early. Deep overhangs can protect the dining table and kitchen from light rain and summer glare, while a high ceiling makes the space feel cooler and more generous. Qualified local professionals should coordinate the final structural and utility design, especially where masonry, gas, electricity, or a large roof span are involved.
Give the timber frame a clear structural language
The beauty of exposed wood is that it shows how the pavilion stands. Posts carry beams, beams support rafters, and braces help the frame feel visually and physically robust. The dark timber in this design contrasts with the pale stone and greenery, making the structure legible from a distance. That contrast works because the frame is repeated consistently at the entry, roof, kitchen side, and fireplace zone.
Choose a stain after viewing it outdoors in different conditions. Warm sunlight, deep roof shade, firelight, and surrounding foliage can all change the appearance of timber. A finish that seems subtle on a sample may appear nearly black against light stone, while one that is too pale may lose definition beneath a tall roof. Repeat the selected tone in smaller details—such as shelf brackets, trim, pendant frames, or furniture legs—so the room feels coordinated.
Connections between timber and stone deserve careful attention. Stone column bases should protect the lower portions of wood from splashback and landscape moisture. Caps, flashing, and clean transition lines help each material perform well and keep the detailing crisp. A long-lasting outdoor room is built not only from attractive finishes but also from thoughtful edges, joints, and places where water is expected to move.
Organize the dining room before filling it with furniture
The dining table is the social heart of this pavilion. It sits under the highest and most protected part of the roof, close enough to the kitchen for serving but far enough from the grill to feel like a separate room. This central placement allows the fireplace and garden views to support the meal rather than compete with it.
Begin furniture planning with circulation. Guests need a comfortable route from the path to their chairs, from the chairs to the garden, and from the kitchen to the table. Chairs should be able to move without blocking an appliance door or narrowing the main aisle. A table that is slightly smaller but correctly proportioned will usually work better than an oversized table squeezed into the center of a tight plan.
For an inviting result, select chairs that provide enough comfort for a long dinner and materials that can tolerate outdoor conditions. The table, chairs, rug, and lighting should share a visual scale. When the furniture is too small relative to large timber posts and a tall roof, the pavilion can feel empty; when it is too bulky, the garden-facing openness disappears.
Design the kitchen as a compact hospitality station
The kitchen occupies one side of the pavilion, leaving the primary sightline toward the fireplace and garden open. This arrangement gives the cook a practical work zone while allowing guests at the dining table to remain connected to the activity. Stainless-steel appliances are balanced by a stone backsplash and timber framing, which keeps the kitchen from looking like a stand-alone commercial installation.
Think through the workflow from storage to preparation, cooking, serving, and cleanup. The grill needs usable landing space, the sink needs counter area nearby, and cold storage should be accessible without crossing the dining path. Include weather-resistant storage for dinnerware, utensils, grilling tools, and cleaning items so the pavilion remains convenient without leaving visual clutter on every counter.
Coordinate utilities before final cladding is installed. Electrical outlets, task lighting, water supply, drainage, gas piping, appliance shutoffs, ventilation, and service access should be planned as part of the architecture. Concealed chases and accessible panels make maintenance easier later and prevent a finished stone wall or ceiling from being opened unnecessarily for repairs.
Let the fireplace create a second reason to gather
A fireplace extends the pavilion beyond daytime meals. It gives the structure a vertical focal point, provides warmth on cooler evenings, and helps the dining room feel like an outdoor version of a living space. The stone surround in this setting matches the column bases and kitchen materials, creating a visual thread across the entire plan.
Place lounge seating to promote conversation, not simply to face a screen or the fire in rigid rows. A low table, side tables, and outdoor fabrics can make the area usable for drinks, reading, or quiet conversation after dinner. Keep the fire feature, hearth, clearances, flue, fuel source, and surrounding finishes coordinated with qualified professionals, and make sure that furniture, textiles, and planting are kept appropriately separated from the heat source.
Use lighting to reveal the room after sunset
Lighting should explain how to use the pavilion when daylight fades. Lantern pendants above the dining table create a lower, warmer layer beneath the high roof. Task lighting at the grill supports cooking safely. Wall-mounted fixtures, shelf lighting, and firelight add depth without making the room feel overly bright. Beyond the roofline, path lights and restrained landscape lighting help guests move through the garden with confidence.
Place each layer on its own control. Bright light is useful for preparation and cleanup, but a lower level works better for a long dinner or an evening by the fire. Aim fixtures so they illuminate work surfaces and steps rather than producing glare in seated guests’ eyes. The goal is to make the architecture and planting visible while preserving the softness of the night garden.
Make planting and hardscape part of the finished composition
The garden is not a backdrop added after construction; it is one of the pavilion’s walls. The steps, path, boulders, flowering borders, lawn, and tree canopy all shape the experience of arrival and create privacy around the open sides. Planting closest to the structure should be low enough to preserve sightlines and allow air movement, while taller shrubs and trees can create a sense of enclosure farther out.
Repeat tones from the pavilion in the landscape. Path stone can relate to the chimney or post bases, while foliage can echo the dark timber with deep green, burgundy, or blue-green texture. Use layered planting rather than a single flat band: low groundcovers at path edges, perennials and shrubs at mid-level, and small trees or taller screening at the perimeter. This layering makes the pavilion feel settled in the landscape through every season.
Plan for weather, cleaning, and future repairs
Outdoor rooms perform best when their maintenance needs are considered early. The terrace should drain away from the structure, and planting should not hold moisture against timber or masonry. Gutters, roof penetrations, stone joints, metal hardware, appliance covers, and drainage channels should be inspected regularly. Choose fabrics and furnishings intended for outdoor exposure, then give cushions and accessories a protected place to be stored when conditions change.
The most useful design principle is coordination. The gable creates an arrival. The timber frame supplies character. Stone adds weight and weather resistance. The dining table establishes the social center. The kitchen makes hosting efficient, the fireplace extends the season, and planting makes the open sides feel protected. When each decision supports the next, a timber-and-stone pergola becomes a durable garden room that rewards use throughout the year.